Tip #18: Mapping FTP & WebDAV to a Drive Letter in Windows
Today's tip is on mapping an FTP account or a WebDAV account to a drive letter in Windows... If you do not currently have an FTP or WebDAV account, you can sign up for a free 1GB WebDAV compatible account at box.net...
The utility we'll be using to map to a drive letter is called NetDrive from Novell... NetDrive can be downloaded from here, or can be found by Googling for NetDrive...
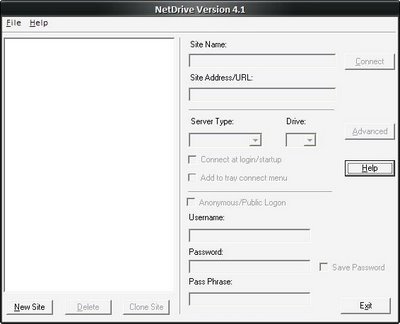
Once you have downloaded and installed NetDrive, launch the application and you should see a Window similar to the one below...

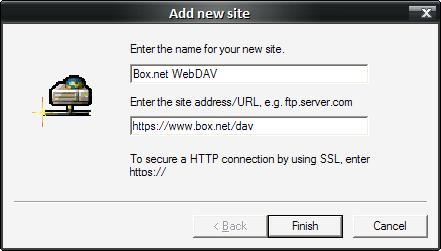
Now, click on the New Site button in the lower left corner, and you'll receive a new window prompting for server information... You can give the connection a meaningful name, and then enter the name of the server you'll be connecting to... For Box.net, we'll be using "https://www.box.net/dav"... Then click Finish...

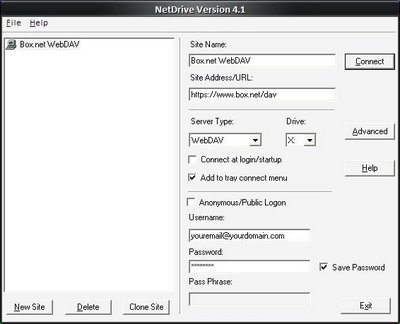
Now, unclick "Anonymous/Public Logon" and enter your account's credentials... You may also make changes to the Server Type and Drive at this point... Finally, click on the Connect button...

Congratulations... You should now have a drive letter assigned to your WebDAV or FTP account, and it is now accessible from Windows Explorer or a Command Prompt... You will be able to treat this newly mapped drive as you would any other local or network drive...
Please leave a comment if you have any questions, and check back tomorrow for new tips...
The utility we'll be using to map to a drive letter is called NetDrive from Novell... NetDrive can be downloaded from here, or can be found by Googling for NetDrive...
Once you have downloaded and installed NetDrive, launch the application and you should see a Window similar to the one below...

Now, click on the New Site button in the lower left corner, and you'll receive a new window prompting for server information... You can give the connection a meaningful name, and then enter the name of the server you'll be connecting to... For Box.net, we'll be using "https://www.box.net/dav"... Then click Finish...

Now, unclick "Anonymous/Public Logon" and enter your account's credentials... You may also make changes to the Server Type and Drive at this point... Finally, click on the Connect button...

Congratulations... You should now have a drive letter assigned to your WebDAV or FTP account, and it is now accessible from Windows Explorer or a Command Prompt... You will be able to treat this newly mapped drive as you would any other local or network drive...
Please leave a comment if you have any questions, and check back tomorrow for new tips...


1 Comments:
At 9/16/2006 9:45 PM, Anonymous said…
Thanks for the tip. It's working great so far!
Post a Comment
<< Home