Tip #20: Remote Help for Family, Friends, and Clients
Today's tip is on providing remote assistance for Windows XP and 2000 users... Hopefully this tip will allow you to save time and money (gasoline: cha-ching!) by allowing you to provide PC help for family and friends without actually having to leave your home or office...
We'll be setting up and using the SingleClick (SC) version of the UltraVNC remote control software... While Windows provides methods for Remote Assistance from within their operating system, I think you'll find that UltraVNC SC provides an easier to use and more powerful application, while also being free... Also, UltraVNC SC is only ~160kB and does not require an install for your clients... Once connected to a client seeking assistance, you'll be able to control their desktop, transfer files to them, as well as carry on a chat conversation...
To start off, we'll be creating a customized version of SingleClick, which will allow you to provide company/support branding, and also tailor the application to use your local machine as the host for the VNC connection... To do this, we first need to download the base files which we'll need to modify... They are downloaded as a file called custom.zip and are available from here...
After you have downloaded the custom.zip file, extract its contents to a location where we can modify the files... The files we'll be focusing on for this article are logo.bmp and helpdesk.txt... The icon files, background.bmp, and rc4.key files can be modified if you wish, but changes are not necessary for the purpose of this demonstration...
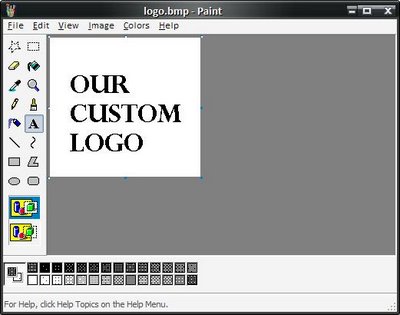
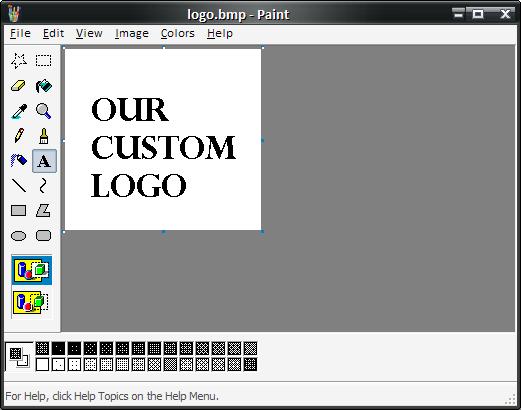
Now that we have the files extracted, lets make some changes to the logo.bmp... Open the file in MS Paint, or an image editing program of your choice... It is important that after any changes, the file be saved as a Windows bitmap, with a maximum of 256 colors, and retain the size of 196 by 181... Although modifying this file is not absolutely necessary, it is the easiest method to provide some degree of customization... Our modified logo is shown below:
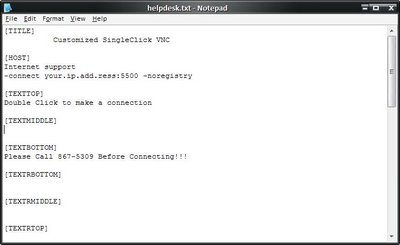
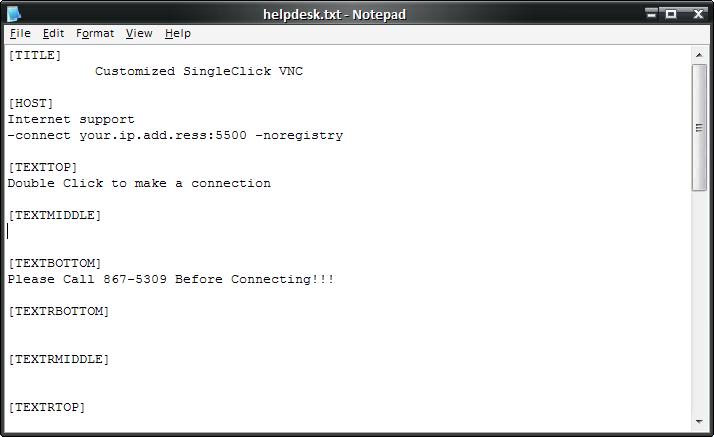
Now save your logo.bmp and let's move on to the next step, which is modifying the helpdesk.txt file... This file can be opened in notepad, and the following changes applied...
First, at the very minimum we'll need to change the HOST block near the top... You'll want to change the displayed IP address to your externally accessible IP address, and leave the port :5500 at the tail end... You may also want to want to change the line that says "Internet support" to "Double-Click Here For Remote Support" to provide better guidance for your users...
The second HOST block outlining an encrypted connection can be removed entirely for this demonstration... Encrypted connections are advisable, but are outside the scope of this article... For more information on encrypting your VNC connections, you can refer to the documentation at UltraVNC...
The remaining blocks should all remain, and can be modified to suit your language and purpose... You should be able to determine the intent of each block based upon its initial contents... They are all basically there to provide instruction to your end user... You'll most likely want to make some further changes after your first custom build, so you can always go back to further modify these comments...
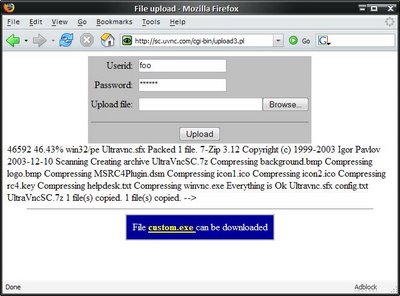
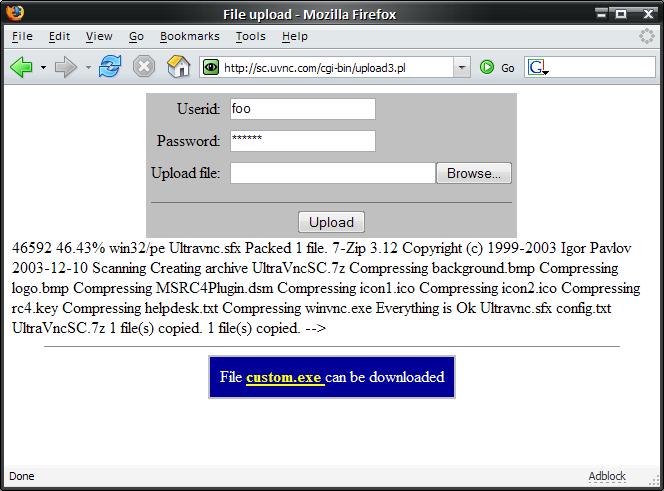
Now that we've modified our files, we'll need to rezip them so we can upload them to UltraVNC's server... Use your favorite (7-zip?) Zip utility to create a standard zip file containing all of the files that were in the original custom.zip, including your modified logo.bmp and helpdesk.txt...
Now go to the UltraVNC SC Creator Tool website here... Fill in the top form using the User ID of "foo" and the Password of "foobar", and in the Upload File field, browse for the new zip file you just created, then click on Submit Query... The website will generate a file named "custom.exe" for you to download for distribution to your clients, or to place on your website for family and friends to access...
Okay, now you should have your own customized SingleClick UltraVNC application... Go ahead and launch it once to ensure that it appears like you had intended... If not, make necessary adjustments and resubmit to the Creator Tool website...
Now that you have your client application built, you'll need to install UltraVNC on your machine so that you can answer your "calls for help"... You can download the UltraVNC application from here... After you have downloaded it, install it...
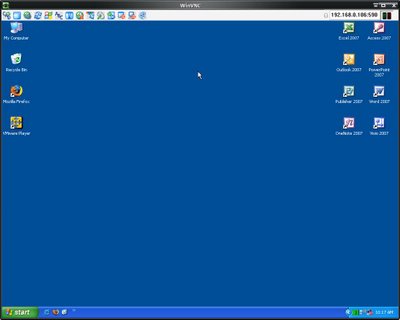
What we'll use to accept the incoming connections is the UltraVNC Viewer in Listen Mode... To launch the viewer in Listen Mode, click on Start/All Programs/UltraVNC/UltraVNC Viewer/Run UltraVNC Viewer (Listen Mode)... You'll now have an icon in your system tray, and the application is now waiting for inbound connections... When someone is trying to connect to your Viewer application, you will informed of the user's IP address and asked whether you would like to accept the connection... If you accept, you will have full control over the client's desktop, as well as have the ability to transfer files back and forth... Simply close the window when you are ready to terminate the session... To discontinue accepting inbound connections, right-click on the system tray icon and select Close TrayIcon...
Also, if you are behind a router or firewall, you'll need to make sure that you have port 5500 forwarded to your host machine where the viewer is installed...
If you have any questions on today's tip, please leave a comment... Check back tomorrow for all new tips...
We'll be setting up and using the SingleClick (SC) version of the UltraVNC remote control software... While Windows provides methods for Remote Assistance from within their operating system, I think you'll find that UltraVNC SC provides an easier to use and more powerful application, while also being free... Also, UltraVNC SC is only ~160kB and does not require an install for your clients... Once connected to a client seeking assistance, you'll be able to control their desktop, transfer files to them, as well as carry on a chat conversation...
To start off, we'll be creating a customized version of SingleClick, which will allow you to provide company/support branding, and also tailor the application to use your local machine as the host for the VNC connection... To do this, we first need to download the base files which we'll need to modify... They are downloaded as a file called custom.zip and are available from here...
After you have downloaded the custom.zip file, extract its contents to a location where we can modify the files... The files we'll be focusing on for this article are logo.bmp and helpdesk.txt... The icon files, background.bmp, and rc4.key files can be modified if you wish, but changes are not necessary for the purpose of this demonstration...
Now that we have the files extracted, lets make some changes to the logo.bmp... Open the file in MS Paint, or an image editing program of your choice... It is important that after any changes, the file be saved as a Windows bitmap, with a maximum of 256 colors, and retain the size of 196 by 181... Although modifying this file is not absolutely necessary, it is the easiest method to provide some degree of customization... Our modified logo is shown below:
Now save your logo.bmp and let's move on to the next step, which is modifying the helpdesk.txt file... This file can be opened in notepad, and the following changes applied...
First, at the very minimum we'll need to change the HOST block near the top... You'll want to change the displayed IP address to your externally accessible IP address, and leave the port :5500 at the tail end... You may also want to want to change the line that says "Internet support" to "Double-Click Here For Remote Support" to provide better guidance for your users...
The second HOST block outlining an encrypted connection can be removed entirely for this demonstration... Encrypted connections are advisable, but are outside the scope of this article... For more information on encrypting your VNC connections, you can refer to the documentation at UltraVNC...
The remaining blocks should all remain, and can be modified to suit your language and purpose... You should be able to determine the intent of each block based upon its initial contents... They are all basically there to provide instruction to your end user... You'll most likely want to make some further changes after your first custom build, so you can always go back to further modify these comments...
Now that we've modified our files, we'll need to rezip them so we can upload them to UltraVNC's server... Use your favorite (7-zip?) Zip utility to create a standard zip file containing all of the files that were in the original custom.zip, including your modified logo.bmp and helpdesk.txt...
Now go to the UltraVNC SC Creator Tool website here... Fill in the top form using the User ID of "foo" and the Password of "foobar", and in the Upload File field, browse for the new zip file you just created, then click on Submit Query... The website will generate a file named "custom.exe" for you to download for distribution to your clients, or to place on your website for family and friends to access...
Okay, now you should have your own customized SingleClick UltraVNC application... Go ahead and launch it once to ensure that it appears like you had intended... If not, make necessary adjustments and resubmit to the Creator Tool website...
Now that you have your client application built, you'll need to install UltraVNC on your machine so that you can answer your "calls for help"... You can download the UltraVNC application from here... After you have downloaded it, install it...
What we'll use to accept the incoming connections is the UltraVNC Viewer in Listen Mode... To launch the viewer in Listen Mode, click on Start/All Programs/UltraVNC/UltraVNC Viewer/Run UltraVNC Viewer (Listen Mode)... You'll now have an icon in your system tray, and the application is now waiting for inbound connections... When someone is trying to connect to your Viewer application, you will informed of the user's IP address and asked whether you would like to accept the connection... If you accept, you will have full control over the client's desktop, as well as have the ability to transfer files back and forth... Simply close the window when you are ready to terminate the session... To discontinue accepting inbound connections, right-click on the system tray icon and select Close TrayIcon...

Also, if you are behind a router or firewall, you'll need to make sure that you have port 5500 forwarded to your host machine where the viewer is installed...
If you have any questions on today's tip, please leave a comment... Check back tomorrow for all new tips...
posted by Jameser @ 5:26 PM
![]()
![]()


0 Comments:
Post a Comment
<< Home