Jameser's Tech Tips

Thursday, August 31, 2006

Tip #40: Portable SSL Enabled Web Server for Windows

Today's tip is on setting up a personal SSL enabled web server for Windows. The application and its configuration files can easily fit on a USB flash drive for portable use. This method is not intended to be used as a large-scale web server, but rather as a simple way to transfer files to a limited group of people.

The application we'll be using is called SHTTPD (Simple HTTPD). SHTTPD provides the ability to use SSL connections, run Perl, PHP, or Python scripts, as well use basic authentication. We'll go over configuring the server for authentication, as well as creating our own self-signed SSL certificate for our SSL connection.

SHTTPD can be downloaded from here.

After you have downloaded the Win32 version of SHTTPD, unzip its contents to a directory on your PC, or to a USB flash drive.

To create our SSL certificate, we'll be using a Windows port of OpenSSL, which can be downloaded from here. Download and extract the OpenSSL files to a directory on your machine, and then download this sample configuration file and place it in the same directory as your OpenSSL files.

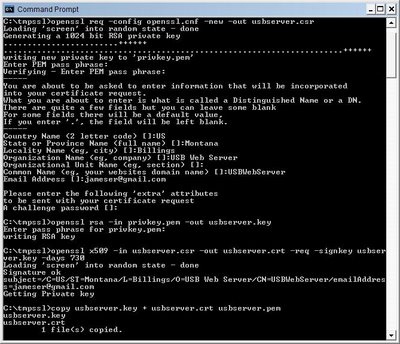
Open a Command Prompt (Start/Run/cmd), and change to the directory where you've extracted the OpenSSL files. Use the following commands to generate a self-signed SHTTPD compatible SSL certificate:

openssl req -config openssl.cnf -new -out usbserver.csr

openssl rsa -in privkey.pem -out usbserver.key

openssl x509 -in usbserver.csr -out usbserver.crt -req -signkey usbserver.key -days 730

copy usbserver.key + usbserver.crt usbserver.pem


These four commands will create the file usbserver.pem, which you can now copy into your SHTTPD directory.


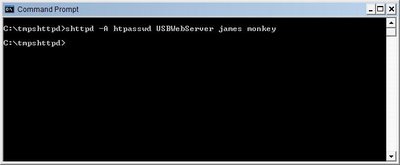
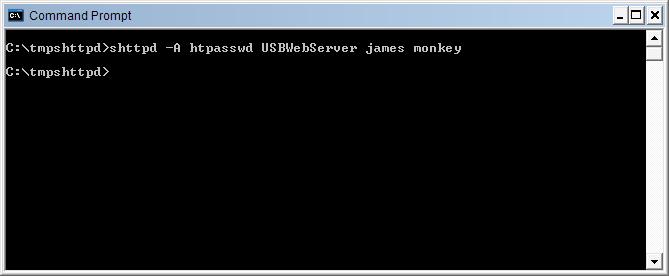
Now that we have our SSL certificate created, we can move on to creating a password file for authentication. In your Command Prompt, change directories to where you have SHTTPD installed. Use the following command to create a file called htpasswd which will contain the user ID and password you supply:

shttpd -A htpasswd YourServerName userid password

Replace YourServerName with a name you'd like to call your server, and also replace userid and password with your selections.


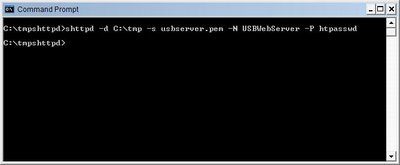
Finally, we are ready to start up our web server. To launch the server using our SSL certificate and password file, use the following command:

shttpd -d C:\tmp -s usbserver.pem -N YourServerName -P htpasswd

Replace directories and filenames as necessary to match your needs. The -d switch sets the root directory for your server.


The settings you specified on the command line will be saved to shttpd.conf, so the next time you can start the server by simply launching shttpd.

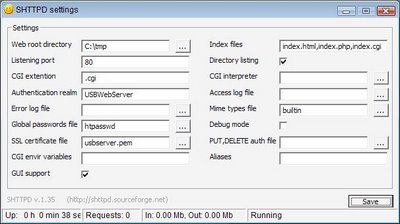
The SHTTPD server runs in the system tray. To bring it to the foreground, right-click on the smiley-faced icon and select Settings. To exit, select Exit SHTTPD.


Your server can now be accessed by going to https://localhost, or https://your.ip.addr.ess If your machine is behind a router, you'll need to set up port forwarding on your router to point to the IP address of your PC and port 443.

If you have any questions, please leave a comment.

Tuesday, August 22, 2006

Tip #39: Backing Up to DVD Using Free Tools in Windows XP

Today's tip is on backing up a directory or drive to recordable DVD media using free tools. The approach we'll be using will also allow you to span multiple DVDs for larger backup jobs.

The first tool we'll be using is DAR (DiskArchive), which was originally developed as a Linux command line application, but has also been ported to the Windows environment. DAR allows you to create archives of directory structures, while splitting the archive file into multiple files of a user defined size.

The second tool we'll be using is called CommandBurner. CommandBurner is a Win32 utility that can burn files or directories from the Windows Command Prompt.

DAR can be downloaded from here, and CommandBurner can be downloaded from here.

DAR allows you to execute an external application after the creation of each slice of an archive. We'll be taking advantage of this feature, by calling upon CommandBurner to burn each newly created slice.

After you have downloaded and installed both DAR and CommandBurner, you can back up specific directories using the following syntax:
(this should all be entered on a single line)

c:\path_to_dar\dar -c "/cygdrive/T/ArchiveName" -s 4000M -p -b -v -R "/cygdrive/c/DirToBackup" -E "/cygdrive/c/Progra~1/Comman~1/CmdBurn.exe burn /f T:\\%b.%n.%e /l %b.%n /hide /eject; rm -f T:\\%b.%n.%e"

In the above example, you'll need to change the T in "/cygdrive/T/ArchiveName", "T:\\%b.%n.%e" ,and "rm -f T:\\..." to a drive letter where you have space for creating a temporary 4GB file. Also, change "/cygdrive/c/DirToBackup" to the drive and directory you'd like to backup. Notice that DAR requires cygwin style paths, while CmdBurn uses the conventional Windows format.

This single command will create 4GB slices of the directory you specify and then directly burn to DVD, opening the tray for new media after each is burnt. Each DVD will be labeled with the ArchiveName and the number of the backup set, (i.e. ArchiveName.1). The file on the disc will be named the same, but also have the .dar extension.


To view the files contained within your backup set, use the following command:

dar -l /cygdrive/x/ArchiveName

Replace the x above with the drive letter of your DVD drive. If the archive is part of a multidisc set, you'll be prompted for additional discs.

To restore all of the files from the archive, use the command below:

dar -x /cygdrive/x/ArchiveName -R /cygdrive/c/DirToRestoreTo

Replace the x with your DVD drive, and also alter where you'd like to have the files restored to.

For additional information on the many features DAR has available, including compression and encryption, you can consult the documentation available at the DAR site.

If you have any questions on today's tip, please leave a comment.

Monday, August 14, 2006

Tip #38: Capturing Audio To MP3 in Windows XP

Today's tip is on capturing audio in Windows XP as an MP3 file. We'll be using a small utility which provides easy usage from within batch files or in scheduled tasks, as well as when used directly.

The free utility we'll use for capturing audio is called SoundCapture, and is available from here. This utility requires the lame_enc.dll, which can be downloaded from here and then placed in the same directory as SoundCapture.exe.

To use SoundCapture, you'll need to first determine the sound card input you'd like to record from. These differ based on your sound card manufacturer, however typing SoundCapture /? from a Command Prompt will render a list of the inputs available to you. The bitrate, sample rate, title, and duration of the recording can all also be adjusted to your needs using the /br, /sr, /title, and /m /length parameters respectively. The final parameter passed is the name you'd like to call the resulting file.


Once you have determined the input to use, and decided on any optional parameters , you can start the recording using a command similar to this:

SoundCapture /in "Stereo Mix" /br 128 /title "Test Rec" /m /length 30 test.mp3


If your sound card has Stereo Mix as an input choice, you should be able to record anything which is playing through your PC's speakers.

If you have any questions, please leave a comment.

Sunday, August 13, 2006

Tip #37: Creating NTFS Hard Links in Windows XP

Today's tip is on creating hard links on Windows XP systems using the NTFS filesystem. Hard links allow you to create an alternate name for an existing file on the same partition.

The hard link itself is simply a reference to an existing file, and points the exact disk location of the original file without actually duplicating the file. The hard link you create can be in a different directory as the original file, or in the same directory using an alternate name, but it must reside on the same partition as the source file.

To create hard links in Windows XP, use the following command from a Command Prompt (Start/Run/cmd):

fsutil hardlink create new_link_name source_file

One of the benefits of creating hard links is that all hard links to a file, as well as the original file, need to be deleted in order to actually delete the original file from the filesystem. So, if you create a hard link to important.doc called hl_important.doc and the original file is deleted, it will still be available by accessing hl_important.doc. If you delete both, then the file will be removed from the filesystem. Keep in mind though that changes to either the original file or its hard links will affect each other. So, if you overwrite important.doc on accident, your hard links will also contain the same overwritten data.

Another obvious benefit is that you can create an easier to type "alias" for a deeply nested but often accessed file. To create a link to C:\Deeply\Nested\File.doc on the root of your C drive, simply use:

fsutil hardlink create "C:\newlink.doc" "C:\Deeply\Nested\File.doc"


If you have any questions on today's tip, please leave comment.

Thursday, August 10, 2006

Tip #36: Scheduled Boot Up From Stand By in Windows XP

Today's tip is on scheduling the boot up of your Windows XP machine. In order to accomplish this, you'll need to have a fairly recent machine with either ACPI or APM power management enabled in the BIOS. This should be the default for most machines unless you've specifically disabled it. If you find that this tip is not working for you, you may want to consult your motherboard's or PC's documentation to determine what power management options are available to you. Also, it is necessary that your PC be in Stand By or Hibernate mode to "boot" in this fashion.

To wake from Stand By automatically, we'll be using a free utility called, appropriately enough, WakeUpOnStandBy. This is a small utility which allows you to specify the time you'd like your machine to "Wake Up", as well as also giving you the option run an application immediately following the return from Stand By. WakeUpOnStandBy can be downloaded from here.

After you have downloaded the utility, launch the program and you'll be presented with a screen similar to the following:


You'll need to specify the date and time you'd like to wake the machine up, and provide an optional application and its parameters you'd like to run. Then click on Start, and finally click on the Switch to Tray button.

Now if you select Stand By instead of Shutdown when you power off your machine at night, it should be waiting ready to go when you arrive back in the morning.


If you have any questions, please leave a comment.

Tuesday, August 08, 2006

Tip #35: Writing to Recordable DVDs from XP's Command Prompt

Today's tip is on writing data to recordable DVDs from the Command Prompt in Windows XP. We'll be accomplishing this by using a tool which was originally developed for Linux, but has been ported to the Windows platform. The tool is called growisofs, a burning utility which uses mkisofs to properly format the data for writing to the disc. This functionality is useful for unattended burning from scripts or batch files.

growisofs and mkisofs can be downloaded from here. They should both be placed in the same directory or within your path so that growisofs is able to call upon mkisofs when needed.

After you have downloaded the programs, you can burn to recordable DVDs from the Command Prompt(Start/Run/cmd) using the following command:

growisofs -Z F: -r -J -speed=2 -V label C:\DirToBurn

The -Z parameter specifies this as being the first session of this particular disc. The drive letter immediately following is the drive letter of your DVD burner. The -r and -J generate "Rational Rock" and Joliet directory information. The -V and the following string specify the volume label for the disc. The optional -speed= parameter allows you to manually select the burning speed. Finally, the last parameter is the directory which you'd like to copy to the DVD.

For subsequent multisession burns, use the exact same command as above, except replace the -Z with a -M and change the directory which you'd like to burn a copy of. All other parameters must remain exactly the same as the initial session.

growisofs -M F: -r -J -speed=2 -V label C:\AnotherDir

For maximum compatibility, you should add the -dvd-compat switch to your final session to write a lead-out on the disc.

growisofs -dvd-compat -M F: -r -J -speed=2 -V label C:\Dir


If you have any questions, please leave a comment.

Thursday, August 03, 2006

Tip #34: Creating DVDs with Free Tools in Windows XP

Today's tip is on creating DVDs from AVI files, WMV files, and other video file types... The quality of the DVD produced will depend on the source input file, but with a high quality source file the results should meet or exceed those of many point-and-click DVD solutions...

The tools we'll need to produce this DVD are mencoder and dvdauthor... Mencoder is part of the MPlayer package and can be downloaded from here... The Win32 port of dvdauthor can be downloaded from here (0.6.9 is the most current Win32 build at this time)... Since both of these tools were originally developed for Linux, and have been ported to Windows, the instructions given below should work equally as well, if not better, on a Linux box...

After you have downloaded and installed both mencoder and dvdauthor, you're ready to start building your DVD... The DVD created in this example will not have menus or chapters, and should autostart when inserted into a DVD player...

First off, we'll need to transcode the source video into a DVD-compliant MPEG2 format... We'll do this by using the following command:
(Note: This command should all be on a single line...)

mencoder source.avi -ovc lavc -oac lavc -lavcopts vcodec=mpeg2video:vrc_buf_size=1835:vrc_maxrate=9800:
vbitrate=5000:keyint=18:acodec=ac3:abitrate=192:aspect=4/3:
trell:mbd=2:precmp=2:subcmp=2:cmp=2:dia=10:predia=-10:cbp:
mv0:vqmin=1:lmin=1:dc=10 -of mpeg -mpegopts format=dvd
-vf scale=720:480,harddup -srate 48000 -af lavcresample=48000
-ofps 30000/1001 -o "outputfile.mpg"


The transcoding process takes a relatively long time, even on a recent machine, so you may want to start this in the evening before going to sleep... source.avi and outfilefile.mpg should be changed to reflect your input file, and desired output file... This command also assumes a 4:3 NTSC DVD... If you're converting for PAL, change the keyint to 15, change the -ofps to 25, and also change the scale= to 720:576...

After you have created the DVD compliant MPEG2 file, you will now need to create the DVD structure using dvdauthor, using the following command:

dvdauthor -v 4:3,720x480 -t -f "yourfile.mpg" -o "C:\output_dir"

The above command will generate the file structure for the DVD, as well as build the necessary VOB files from your MPEG file...

And finally, we just need to generate a TOC (table of contents) for our DVD using the following command:

dvdauthor -T -o "C:\output_dir"

Make certain that the output directory you specify in the command above is the same as the previous command...

You should now have a VIDEO_TS and AUDIO_TS directory in your specified output directory... These directories and their contents can now be burned to a DVD using a burning application of your choice, and the resulting DVD should be playable on pretty much any DVD player...

Please leave a comment if you have any questions...

Wednesday, August 02, 2006

Tip #33: Instant FTP Server for Windows XP

Today's tip is on setting up a simple and portable FTP server for serving files across a LAN or to a remote user... A few days ago we discussed a SFTP solution which provides a secure pathway for file transfers, however it requires special client software for your remote user to connect... The solution we'll be discussing today doesn't provide any level of encryption, but also doesn't require any special client software to connect to it... You'll need to make the determination as to whether the files you'll be transferring are sensitive in nature, and then choose which solution fits your needs... If the contents of your files are sufficiently encrypted, either solution should suffice...

The utility we'll be using to provide FTP services is called the "Swiss File Knife", a.k.a sfk, from stahlworks... sfk is mainly intended for the processing and manipulation of text files, however one of the "bonus" features of this application is that you can also use it as an instant FTP server... If you download sfk for the purposes of using the FTP server, you'll also definitely want to check out the documentation to discover its many other capabilities... If you carry a USB flash drive, it is a must-have utility to add to your collection...

sfk can be downloaded from here...

After you have downloaded the utility and extracted sfk.exe to a directory in your path (C:\Windows), starting the FTP server is a simple process... Open a command prompt (Start/Run/cmd) and change directories to the location where you'd like to serve up files... Then issue the following command to start the server:

sfk ftpserv

The server can only provide a connection to a single client at a time and does not require any level of authentication... However, it does provide an extremely simple method of transferring large files to and from remote users when a full-blown FTP server may be overkill...

To allow write access to the directory, add the -rw switch to the command... Also, an alternate port can be specified by using the -port=portnumber switch... If your ISP blocks access to port 21, you'll need to use the -port switch to select an alternate port to use... Any port above 1024 is a good choice...

If you are behind a router or firewall, you'll need to configure port forwarding to the machine running the FTP server... If you did not have to change the port the server is running on, users can connect to your FTP server with the following command:

ftp your.external.ip.addy

A connection to a server with a port other than the default requires a different approach... Remote users can access your FTP server using XP's FTP client in interactive mode, then use the open command while specifying your external IP address and your configured port number:

ftp
ftp>open your.external.ip.addy port#

The user and password prompts can be left blank... Use bin to change to binary mode, asc to change to ASCII mode, get filename to retrieve files from your server, put filename to upload files to you server, and dir to show available files...


If you have any questions, please leave a comment...

Tuesday, August 01, 2006

Tip #32: Using Custom Visual Styles in Windows XP

Today's tip is on applying custom Visual Styles, or themes, to Windows XP... By changing the current theme of your XP desktop, you can achieve the look of Windows Vista, OS X, or other customized layouts while still running XP...

If you'd like to apply a different Visual Style to your desktop, you will first need to patch or replace the uxtheme.dll in the C:\Windows\system32 directory... The original uxtheme.dll provided by Microsoft requires that Visual Styles be digitally signed, so we'll replace the DLL with one which allows unsigned Visual Styles to be installed...

The easiest way to achieve our desired results is to download an already patched DLL... To patch Windows XP SP2, you can download the "UXTheme Patch for Windows XP SP2 Final" utility from here, which is also available elsewhere...

After you have downloaded the patched uxtheme.dll, open Windows Explorer and navigate to the Windows\system32 directory... Now, rename the original uxtheme.dll to uxtheme.bak so that we'll have a backup in the event we need one later... Now extract or copy the patched uxtheme.dll into the C:\Windows\system32 directory...

When copying the patched file, you will get a notice similar to the one below:


Click on Cancel to continue copying in the patched uxtheme.dll...

You'll also receive another alert window asking if you'd like to keep these unrecognized file version, as shown below:


Click on Yes to accept the new uxtheme.dll...

Next, you'll need to reboot your machine for our changed uxtheme.dll to load...

After you return from your reboot, you'll now be ready to find some Visual Styles to install on your machine... DeviantArt has many to choose from, and is where I downloaded the Vista inspired theme below:


Most downloaded themes simply require unzipping the packaged files into C:\Windows\Resources\Themes, but you should check any documentation that comes with the files for any further instructions...

After you have installed your desired theme, set it to be the current theme by right-clicking on the desktop, selecting Properties, click on the Appearance tab, and under the "Windows and buttons" pulldown, select your new theme and click Apply...


Please leave a comment if you have any questions, or if you've found good sources for additional Visual Styles...